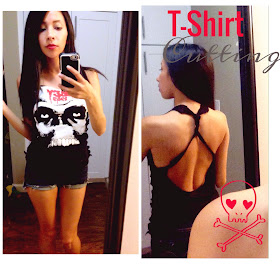
It's been a while and I am so sorry. I've done a couple of DIY's but I haven't had any time to post!! The last time I wrote I was looking for a job, I found a wonderful school to work at and I have been crazy busy adjusting to my new schedule, trying to find time for Lola and writing. Luckily, today Chris and I had some time to clean out our closets. I pulled out a couple of Chris' old t-shirts that we were going to donate and thought this would be the perfect opportunity to show you how to make a huge shirt into something wearable and cute. I wanted to make this shirt with out any sewing or headaches this is fairly easy and please remember we all have different bodies so take this as a guide and feel free to adjust to your needs!
Supplies:
Large T-shirt
Scissors
Ruler (If you're in that kind of stuff)
 |
| Apparently my husband really likes skulls because over half of his shirts had them. Anyway, this was a medium I usually wear an extras small so i had plenty of space to work with. |
|
 |
| Next, cut the neck line. I took one of my favorite tanks and studied the neckline I tried my best to mimic it and keep the image intact as well. Cut the front and back separate just to make sure it comes out even. |
 |
| Again, look at your tank and try to mimic the arm holes ( arm holes?! haha ) make sure to repeat on the opposite side. I usually fold my shirt in half and make sure they are similar to each other. |
 |
| Ok, so as you can see they didn't come out perfect but that IS OK, as you go on you can adjust and make it work. I turned the shirt backwards and cut two inch slits along the sides. This controls how tight you want it, the further in the slits are the tighter the shirt. I also took the liberty to take some length off my shirt and cut 3in off the bottom. |
 |
| This step is optional, I cute my slits in half and made them skinnier so my sides wouldn't be as bulky its personal preference really. |
 |
| Here is an example of how it will look if you do cut them in half, the top three are the skinner ones, the bottom 3 are regular. |
 |
| Cut all slits down the middle and tie the corresponding slit with the other, cut off any excess material. |
|
 |
| Now that you have one side down , repeat to the other side. I usually try it on before I do the other side just to gauge how much material I need to cut on the other side. |
 |
| Both sides are now done but the shirt isn't complete yet! |
 |
| Turn your shirt over and give it a deeper cut on the sides resembling a racer-back tank. |
 |
| Take the two straps and join them together with a small piece of excess t-shirt from earlier. |
 |
| I took a long thin piece and wrapped it around both pieces and tied it off at the bottom and top (cut off excess). |
 |
| Fold your tank in half and make slits along the back (only the back) starting from the armpit going down. I made the slits long to short. |
 |
| Unfold and cut a triangle out of the cloth that's left.(follow the pink dots!) This will give you an open back, I do want to say be careful, I over did this last shirt and I don't think it'll last as long as my first because the straps are so thin!! |
 |
| Here it is ladies and gentlemen, an awesome new (used) shirt!! |
 |
| Here's a back view & you can see what I mean about over doing the triangle. lol. |
Thanks for following along and I really hope your shirt came out super awesome and you love it and you share with all of your friends and family where you got this nifty idea. I also know this could have been a lot easier if I had measured it out but I'm definitely more of a go with the flow kind of person. I really hope to hear from you and your experience with trying this out!!


No comments:
Post a Comment